
The fire hydrant exercise might have gained fame during the '80s aerobics craze. (Thanks, Jane Fonda!) But that doesn't mean this classic butt move doesn't hold merit today. Add it to your fitness program, and you'll find that along with gaining stronger glutes, you'll also strengthen your core.
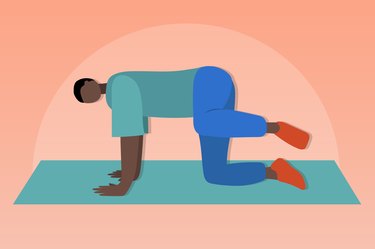
- What is the fire hydrant exercise? It's a glute exercise that you do by getting on your hands and knees and then raising a leg to your side. Picture a dog looks lifting its leg to pee on a fire hydrant. That's what this looks like.
- What muscles does the fire hydrant work? It builds the gluteus maximus and medius, but also works your deep core muscles and spinal stabilizers.
- What are the main fire hydrant benefits? This isolation move can is ideal for building glute size. It can also help reduce the risk of hip, back and lower-body injury by training your side glutes and core.
Video of the Day
How to Do the Fire Hydrant Exercise With Perfect Form
- Get on the floor on all fours, shoulders over your wrists and knees below your hips.
- Look back between your legs to make sure you can’t see your feet; if you can, rearrange them so they’re positioned back behind you.
- Brace your core to flatten out your back.
- Keeping your gaze a few inches in front of your hands so that your head stays in a neutral position and your spine is long, lift your right knee to the right toward your hip. Stop at hip height or as high as you can comfortably.
- Lower your knee to the starting position and repeat.
- Do all reps, then switch sides and repeat.
Got Wrist Pain?
If you have a history wrist pain, this can be a difficult exercise to do from an all-fours position. Try placing two dumbbells on the floor and gripping them with a neutral grip.
Watch the Full Tutorial
Fire Hydrant Exercise Benefits and Muscles Worked
Looking for a great glute exercise? Then you're in luck. The fire hydrant targets the glutes to build strength and muscle size.
"The exercise not only works the gluteus maximus, the largest gluteus muscle, but also your gluteus medius and tensor fascia latae, which are the muscles on the side of your butt," says Kelly Froelich, CPT, a certified personal trainer in New York City and co-founder of Balanced.
At the same time, the move targets stabilizer muscles in your core, including the front muscles in your abdomen and the transverse abdominis or the muscles in your lower back. These are all responsible for holding your spine supported and stable.
Once you lift your leg, you're then working the obliques, the muscles on the side of your abdomen, which stabilize you and prevent you from tipping over.
Along with the above-mentioned muscles, the move also hits the hip abductor and adductor muscles. These are the outer and inner thighs, allow you to move side to side and often don't get enough love, Froelich says.
Who Is This Move Best for?
The fire hydrant exercise is a must for all levels.
“If you’re new to fitness, this is a great exercise because it works on stabilization, which is a key component of gaining strength and range of motion,” Froelich says.
Plus, if you do a lot of walking, running or cycling, the exercise can be particularly beneficial. That's because it strengthens your body as it moves from side to side, helping combat muscle imbalances and reduce the risk of injury.
5 Fire Hydrant Tips for Better Results
You probably don't often find yourself in the quadruped fire hydrant position in day-t0-day life. So learning correct form, even if it feels a bit awkward, is crucial to making the move as effective as possible (not to mention avoiding injury).
1. Look Between Your Fingertips
One of the most common fire hydrant mistakes is looking up throughout the exercise. The problem is, when you raise your head to peek in front of you, you automatically curve your spine. That puts unneeded stress on the back of your neck and potentially your lower back as well.
Keep your head down and eyes focused on the space between your fingertips (or just slightly in front of them), and your spine will stay in a long, neutral position. That's what you want.
2. Keep Your Hips Level
Speaking of mistakes, it's easy to overdo it with this exercise and lift your knee too far with each rep. Exactly how you should raise your knee depends on your mobility and strength levels. But never raise any higher than you can using while keeping your hips level.
Think: As you raise your right side's knee, your right hip should stay completely stationary. It shouldn't hike up or stack over your left hip
"Keeping your hips level will ensure that you're working the muscles to lift your leg and not using momentum," Froelich says. says.
3. Distribute Your Weight Evenly
It's natural to want to shift your weight to the opposite side when you're lifting your leg. By doing so, you'll decrease the efficacy of this move.
Instead, focus on keeping that weight centered. You can help fight the urge to shift and even add a challenge by picking up the opposite hand (so if you're lifting your left leg, pick up your right hand).
"That will force your body to stabilize evenly and not tip over with two limbs off the floor," Froelich says.
4. Pretend It's a Plank
You might love doing downward dog in yoga class, but for this exercise, resist the urge to stick your butt up. Instead, keep your back as flat as a plank. "It should feel like you're bracing for somebody punching you in the stomach," Froelich says.
Note: This is extra important if you have a history of lower back pain. Bracing your core this way and minimizing any dip in your lower back will protect (and strengthen) your back.
5. Keep Your Elbows Slightly Bent
Locking out your elbows can put extra pressure on your joints. If you start to feel any straining around your elbows, take that as a sign that you need to relax them a bit.
How Many Sets and Reps Should You Do?
Aim for 3 sets of 8 to 12 repetitions. But know that if you have only time for 1 set, that’s better than nothing. And if you want to increase the intensity, you can always add ankle weights or resistance bands, Froelich says.
Turn Up the Burn With These 5 Variations
Move 1: Mini-Band Fire Hydrant
By doing a fire hydrant with a band, you'll add resistance to the move, which will make it more challenging on your side glutes as well as your core.
- Place a resistance band around your legs, just a few inches above your knees.
- Get on your hands and knees on the floor.
- Lift your right knee to the right as high as you can.
- Lower your knee to the starting position and repeat.
- Do all reps, then switch sides and repeat.
Move 2: Dumbbell Fire Hydrant
Doing a fire hydrant with a dumbbell squeezed behind your raised knee presents quite the challenge. Keeping the weight in place lights up the hamstrings in the back of your thighs and the actual poundage increases the challenge on your glutes and core.
- Get on the floor on your hand and knees
- Place a lightweight dumbbell behind the crook of your right knee.
- Squeezing the weight in place, lift your right knee to the right as high as you can.
- Lower your knee to the starting position and repeat.
- Do all reps, then switch sides and repeat.
Move 3: Fire Hydrant Pulse
When you want to change your muscle definition, you need to work a muscle to fatigue. Adding pulses is an effective way to maximize fatigue when you're using little or no resistance.
- Get on the floor on your hands and knees.
- Lift your right knee to the right and slowly pulse it up and down 1 or 2 inches, avoiding touching the floor between pulses.
- After up to 30 seconds of pulses, lower your knee to the starting position.
- Switch sides and repeat.
Move 4: Fire Hydrant With Kick
Adding a kick to the exercise ups how hard your core has to work (to keep you from falling over) while also working your quadriceps.
- Get on the floor on your hands and knees.
- Lift your right knee to the right, then extend your knee so your foot is in line with your hips.
- Bend your knee, lower it to the starting position and repeat.
- Do all reps, then switch sides and repeat.
Move 5: Standing Fire Hydrant
Doing the move as a standing glute exercise can be a great alternative if you have joint or mobility issues that make getting onto the floor a no-go. Bonus: This modification will work your balance in a big way, and you'll feel the glutes of your standing leg working. Place one hand on a sturdy object for help, if needed.
- Stand with your feet about hip-width apart.
- Shift your weight to your left foot and bend your right knee slightly. Lift your right leg to the right.
- Lower your leg to the starting position and repeat.
- Do all reps, then switch sides and repeat.
