
We all know stretching is important — whether to address specific tight muscles, poor posture or a general sense of sluggishness in the morning. But you might notice that the results of stretching seem fleeting. Why can't the short-term relief from a good stretch last longer?
It's partly because of the properties of muscle tissue and the nervous system. But — to simplify an otherwise complex concept — one of the basic reasons many of us feel like we are constantly tight in the same areas may be that we are not strong enough in opposing muscle groups.
Video of the Day
Video of the Day
We often think of muscles contracting only when we consciously tighten up or flex. But in reality, our muscles maintain a passive, low-level contraction at rest, which is commonly referred to as muscle tone.
Among other functions, this resting muscle tone provides some structure for our posture, which is part of why we don't have to think consciously about contracting muscles when we sit or stand. Broadly, it helps maintain any given joint in a relatively neutral position, which can offset recurrent tightness.
Here's another way to think about it: Take a rubber band or hair elastic and try to stretch it repeatedly. Once you stop actively pulling on it, it should rebound to its original, shortened length.
But stretching it around something strong enough to hold it in that position (like your wrist, or a solid jar) helps it maintain its lengthened state. By that same reasoning, we shouldn't be all that surprised that stretching a muscle without strengthening doesn't always elicit a long-term change.
Some studies, like a small December 2015 report in the International Journal of Sports Physical Therapy, have also suggested a reverse relationship, hypothesizing that tightness in opposing muscles contributes to limitations in muscle engagement. But whether the observed impairment is the cause or the effect, the best strategy to address this relationship doesn't necessarily require a chicken-or-egg discussion.
Instead, try pairing these stretches and strengthening exercises together to break the cycle and make your stretching routine count!
Pair 1: Upper Back
Stretch 1: Supine Pectoral Stretch
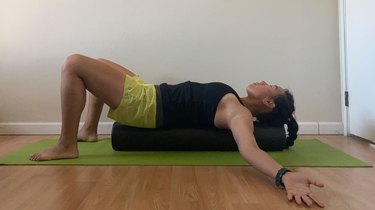
- Lie on your back on a full-length foam roller or a large towel rolled up lengthwise. The foam roller or towel should be lined up vertically in line with your spine.
- Find a comfortable, stable position with a neutral spine. This may require bending your knees and planting your feet on the ground, or making sure the back of your head is supported.
- Slowly bring your arms out to the side at a 90-degree angle to create a T shape. Rest the back of your hands on the ground. Lower your hands toward your hips to lessen the stretch.
- Hold for 30 to 60 seconds.
Move 1: Reverse Fly
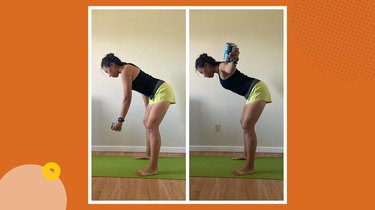
- Start standing with your feet hip-distance apart with your arms at your sides.
- Hinge your upper body forward so your torso forms a 45-degree with the floor.
- Squeeze your shoulder blades together to lift your arms without bending your elbows, driving the motion from the shoulder blades.
- Repeat.
Tip
You can do this with just your body weight or add one- to three-pound weights. (Canned food works in a pinch!)
Pair 2: Neck
Stretch 2: Levator Scapulae Stretch
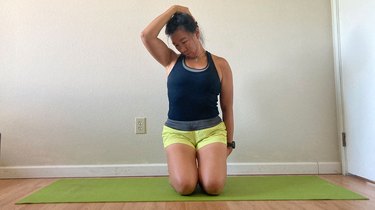
- From a seated or kneeling position, look down toward your right armpit.
- Apply gentle pressure on the crown of your head with your right arm.
- Deepen the stretch by reaching your left arm to the small of your back or pulling up on your left leg.
- Hold for 30 to 60 seconds, then switch sides and repeat.
Move 2: Chin Tuck
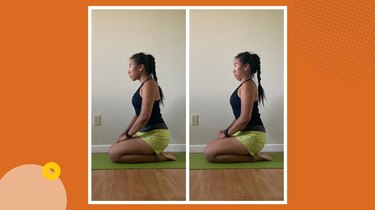
- From a seated or kneeling position, slide your head backwards as if it were on a track running parallel to the ground. This motion is small: It should result in a "double chin" effect, not a nodding motion.
- Return your head to its starting position.
- Repeat.
Tip
Progress this exercise by lying on your back and pulling your head into a pillow.
Pair 3: Hips
Stretch 3: Hip Flexor Stretch
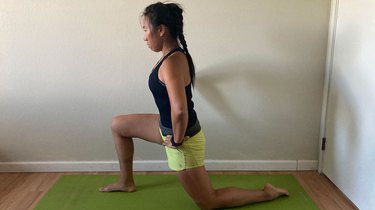
- From a half-kneeling position, walk your front leg forward to a distance that is stable and comfortable.
- Place your hands on the sides of your pelvis, engage your core and tilt your pelvis backward. It may feel like your thumbs are moving toward the ground and fingers are moving toward the navel.
- Lean your whole body forward while maintaining a neutral pelvis position, shifting your weight toward the front leg until you feel a tolerable stretch in the rear hip.
- Hold for 30 to 60 seconds, then repeat on the other side.
Move 3: Pigeon Glute Activation
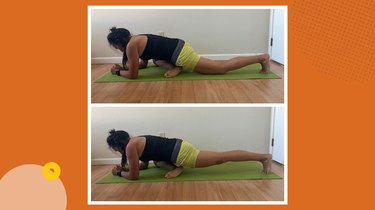
- Start in a high plank position, then bend your right leg under your body, level with your chest and/or abdomen.
- Support your body weight on your hands or elbows.
- Tuck your left toes and squeeze the left glute to lift that thigh off the ground, pushing the back of the left thigh toward the sky.
- Slowly relax the left glute with control.
- Repeat for 3 sets of 15 repetitions, then repeat on the other side.
Pair 4: Lower Back
Stretch 4: Child's Pose
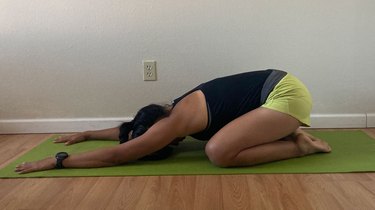
- Start on your hands and knees (called a quadruped position), then sit your hips back toward your heels.
- Keep your arms overhead and reach away from your feet.
- Hold for 30 to 60 seconds.
Tip
Walk both hands toward the left and sit back into your right heel for a more profound stretch. Repeat on the other side.
Move 4: Supine March
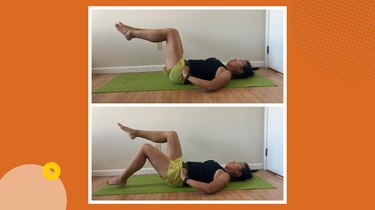
- Start lying on your back, then bring your legs up to a tabletop position. Your hips and knees should form 90-degree angles.
- Place your hands at the sides of your pelvis so your index fingers lie on your hip bones. Sandwich your thumbs between your back and the ground.
- While engaging your core, slowly lower one leg toward the ground by extending at the hip only (your knee should stay bent). Stop once the heel hits the ground — or when you feel your pelvis start to tip forward under your hands. It may feel as if your thumbs are receiving less pressure.
- Return the leg to the starting position and repeat on the other side. This is one full repetition.
- Continue alternating sides for 3 sets of 8 to 15 reps depending on your ability to perform this move while keeping your form consistent. And don't hold your breath: Be sure you're breathing throughout.
Tip
Make this exercise harder by straightening your knee as you lower your leg.
- International Journal of Sports Physical Therapy: "EFFECT OF RESTRICTED HIP FLEXOR MUSCLE LENGTH ON HIP EXTENSOR MUSCLE ACTIVITY AND LOWER EXTREMITY BIOMECHANICS IN COLLEGE-AGED FEMALE SOCCER PLAYERS"
- Journal of Bodywork and Movement Therapies: "Human Resting Muscle Tone (HRMT): Narrative Introduction and Modern Concepts"
Was this article helpful?
150 Characters Max
0/150
Thank you for sharing!
Thank you for your feedback!