Push-ups are easily one of the most effective exercises for building upper-body strength. They're versatile, too: You can try out tons of push-up variations to meet your current fitness level and reach your goals.
However, push-ups are also one of the hardest upper-body moves. Despite their seemingly simple nature — just lower yourself down and push back up, right? — many people can't do push-ups, and mastering the technique is notoriously tough.
Video of the Day
If you've been feeling down about your push-up performance, try scaling back to some slightly easier alternatives and modifications as you build up your push-up strength. Here are a few common reasons why you might not be able to do push-ups, plus modifications from personal trainers.
If: Your Core Isn’t Strong Enough Yet
Do: Plank Holds and Commandos
A common culprit behind poor push-up form is a weak core, says Missy Berkowitz, personal trainer at Dig Your Deepest. Often, someone with weak core muscles will collapse in the midsection at some point during a push-up — usually during the ascent.
Plank holds and commandos are perfect push-up alternatives because they strengthen your core while mimicking the push-up position, Berkowitz says.
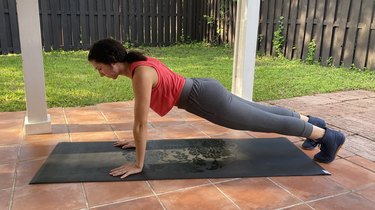
1. Plank Hold

- Start on all fours on the ground.
- Stack your elbows and shoulders directly above your wrists and your hips above your knees. Position your feet so that your toes are on the floor.
- Lift your knees off the ground so your body is in a straight line from head to hips to heels.
- Hold this position for 30 to 60 seconds.
2. Commando
- Follow the steps above to get into a high plank position.
- Lower your right forearm to the ground, followed by your left forearm.
- Press your right arm back up, followed by your left arm.
- Repeat this sequence in the opposite order (left, then right).
- Continue alternating for 5 to 10 reps on each side.
If: You Feel Wrist Pain While Doing Push-Ups
Do: Forearm Planks
Wrist pain during push-ups can have a number of underlying causes, says DeBlair Tate, personal trainer and owner of 8Figured. Depending on the exact cause, the best push-up alternative could vary greatly, she says.
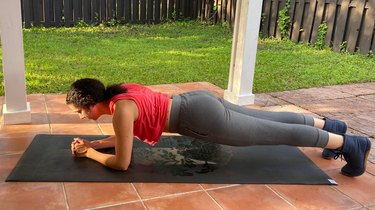
Berkowitz echoes this sentiment, saying that typical substitutes like a chest press can aggravate an injury. However, elbow planks can take the pressure off of your wrist while still strengthening your core, back, shoulders and arms. Use a mat or pad beneath your arms to alleviate even more pressure.
3. Forearm Plank

- Start on all fours on the ground.
- Place your forearms on the ground and position your shoulders so that they’re stacked directly above your elbows.
- Make sure your hips are stacked above your knees.
- Position your feet so that your toes are on the floor.
- Lift your knees off the ground so your body is in a straight line from head to hips to heels.
- Hold this position for 30 to 60 seconds.
If: You Feel Elbow Pain While Doing Push-Ups
Do: Hollow Holds
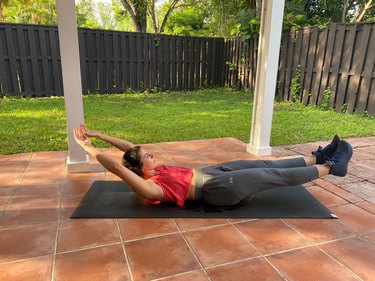
"A hollow hold is a great alternative to doing a plank hold without putting stress on the shoulders, elbows or wrists," Berkowitz says. Plus, "being in that isometric position will keep your abdominals and back muscles engaged," adding to your overall push-up strength.
4. Hollow Hold

- Lie face-up on the ground. Extend your legs and point your toes.
- Extend your arms above your head.
- Tighten your core and press your lower back into the ground. Lift your upper back and legs up from the ground. Only your lower back and hips should be in contact with the ground.
- Hold for 30 seconds.
Tip
Beginner modification: A beginner can start in a seated position and extend one leg out, working up to both legs out while having torso a few inches off the ground, Berkowitz says.
If: You Feel Shoulder Pain While Doing Push-Ups
Do: Hollow Rocks
Like wrist and elbow pain, shoulder pain during push-ups can result from a number of causes. If you're having a lot of pain, both Berkowitz and Tate recommend consulting a physical therapist before continuing push-ups or similar exercises — it's always best to address the root cause of pain.
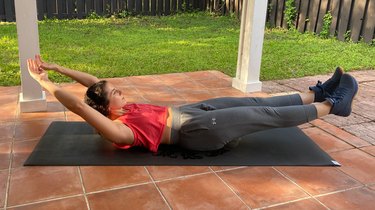
That said, not all push-up alternatives are off-limits. Berkowitz recommends focusing on core strength if your shoulders hurt too badly to do push-ups. Hollow rocks advance the hollow hold slightly, adding in some dynamic movement to test your core strength.
5. Hollow Rock
- Lie face-up on the ground. Extend your legs and point your toes. Extend your arms above your head.
- Tighten your core and press your lower back into the ground. Lift your upper back and legs up from the ground. Only your lower back and hips should be in contact with the ground.
- Once you assume the hollow body position, rock back and forth using your core strength to shift your weight balance from your legs to your upper body.
- Repeat for 5 to 10 reps.
If: Your Upper Body Isn’t Strong Enough Yet
Do: Knee or Incline Push-Ups
Unsurprisingly, upper-body strength is essential for perfect push-up form. If you're not quite able to perform a standard push-up yet, don't fret, though. You can try two push-up modifications to build your upper body strength while practicing push-up technique.
Knee and incline push-ups are perfect for beginner and intermediate exercisers who struggle to keep their shoulder blades back during a push-up, Tate says. Knee push-ups can help people who struggle with both core and upper body strength, while incline push-ups are slightly harder and require more core engagement.
6. Knee Push-Up
- Start on all fours on the ground, ensuring your arms are perpendicular with the ground and your knees are slightly behind your hips.
- Keep your core tight and lower your torso to the ground with control, stopping just before your chest touches the ground.
- Press back up until your arms are fully extended.
- Repeat for 5 to 10 reps.
7. Incline Push-Up
- Set up a bench, chair, couch, table or other sturdy object you have handy — just make sure it won’t slide when you put pressure on it.
- Place your hands on the edge of your bench.
- Step your feet back so that your legs extend fully.
- Bend at the elbows to lower your chest to your equipment.
- Press back up until your arms extend fully.
- Repeat for 5 to 10 reps.
If: Your Elbows Flare Out While Doing Push-Ups
Do: Hand-Release Push-Ups or Modified Push-Up Negatives
Hand-release push-ups force you to learn proper hand and arm positioning for push-ups. This move is advanced, so opt for push-up negatives if you're a beginner. These can teach you to control your body for the entire duration of the exercise, as well as cultivate mind-body awareness that helps with standard push-ups.
"My favorite cue is to pretend you have lemons in your armpits," Berkowitz says. "You want to squeeze those lemons to keep them from falling and that will help keep your elbows from flaring out."
8. Hand-Release Push-Up
- Start on all fours on the ground. Stack your elbows and shoulders directly above your wrists and your knees slightly behind your hips.
- Position your feet so that your toes are on the floor.
- Lift your knees off the ground so your body is in a straight line from head to hips to heels.
- Lower your entire body to the ground and briefly lift your hands off the ground.
- Place your hands back on the ground and press your body back up in one straight line.
9. Modified Push-Up Negative
- Think of this as a really, really slow knee push-up.
- Start on all fours on the ground, ensuring your arms are perpendicular with the ground and your knees are slightly behind your hips.
- Keep your core tight and slowly lower your torso to the ground with control, stopping just before your chest touches the ground.
- Press back up until your arms are fully extended.
- Repeat for 5 to 10 reps.
Tip
Count to three on the way down, then press back up on a one count.
If: Your Knees Lock Out Too Hard While Doing Push-Ups
Do: Slow Mountain Climbers
If your knees hurt during push-ups, it could be because you're unknowingly locking out your legs during the movement. This could be a compensation for weakness in another muscle group, such as your core, Tate says, and it can be fixed by scaling back the push-up to identify those compensations.
Tate recommends trying slow, controlled mountain climbers or knee push-ups in this scenario, as both movements can alleviate pressure on the knees and allow you to pinpoint muscle imbalances.
10. Slow Mountain Climber
- Get into a high plank position (arms extended).
- Bring your right knee to your left elbow.
- Step your right foot back and bring your left knee to your right elbow.
- Continue alternating for 5 to 10 reps on each side.
- Keep your back as straight as possible for the entire duration of your set.